Connecting to Databricks
This guide will walk you through the necessary steps to connect decisionOS to your Databricks Platform.
Prerequisites
Before starting, ensure you have the following:
- A Databricks instance.
- Access to the decisionOS Platform.
Connection Instructions
The following steps will walk your through connecting to your Databricks instance and pulling down a dataset into your local environment.
1. Create a Service Account
Using Personal Access Tokens
You can use a personal access token to authenticate with Databricks which will allow you to have the same access and permissions as your user within Databricks
Follow these steps to generate it:
- Log in to your Databricks workspace.
- Click on your Databricks username or profile icon located in the top right corner of the workspace.
- From the dropdown menu, select User Settings.
- Within the User Settings page, locate and click on the Developer tab on the left side.
- Then select the Access Tokens "Manage" option.
- Set the Token Lifetime - This can be set to indefinite by not specifying a lifetime.
- Click on "Generate New Token".
Using Machine-to-Machine (M2M) OAuth
This approach creates a service account, which is it's own user, representing the causaLens application. This user can be given their own permissions to access resources.
Please note that you will need to have the appropriate permissions within Databricks to be able to create users. You need to create a Databrick service principal for your application M2M authentication. Here are the steps:
- Login to Databricks Account Console
- Select User Management from the left navigation panel.
- From the Service Principals tab, click on Add service principal
- (Azure only) Select “Databricks managed” under the “Management” section
- Enter a name for the service principal and click on Add.
- Select the service principal you just created.
- Click on Generate Secret.
- Copy the Client ID and Secret from the pop-up window and store them somewhere as you won’t be able to see the “Secret” again
- Assign the service principal to the workspace, see the instruction
- Grant the service principal with the corresponding unity catalog privileges of the catalogs/schemas/tables which will be accessed by the application
2. Register your Databricks Connection with decisionOS
There are two ways to register the connection in decisionOS.
Firstly, if you are working in our decisionStudio environment then you can create the connection via the "Connections" tab in the user interface. With the connections panel open (the plug icon on the left hand side), then you can pick a connection type to create. Click the "Databricks" icon and you will see the form presented below.
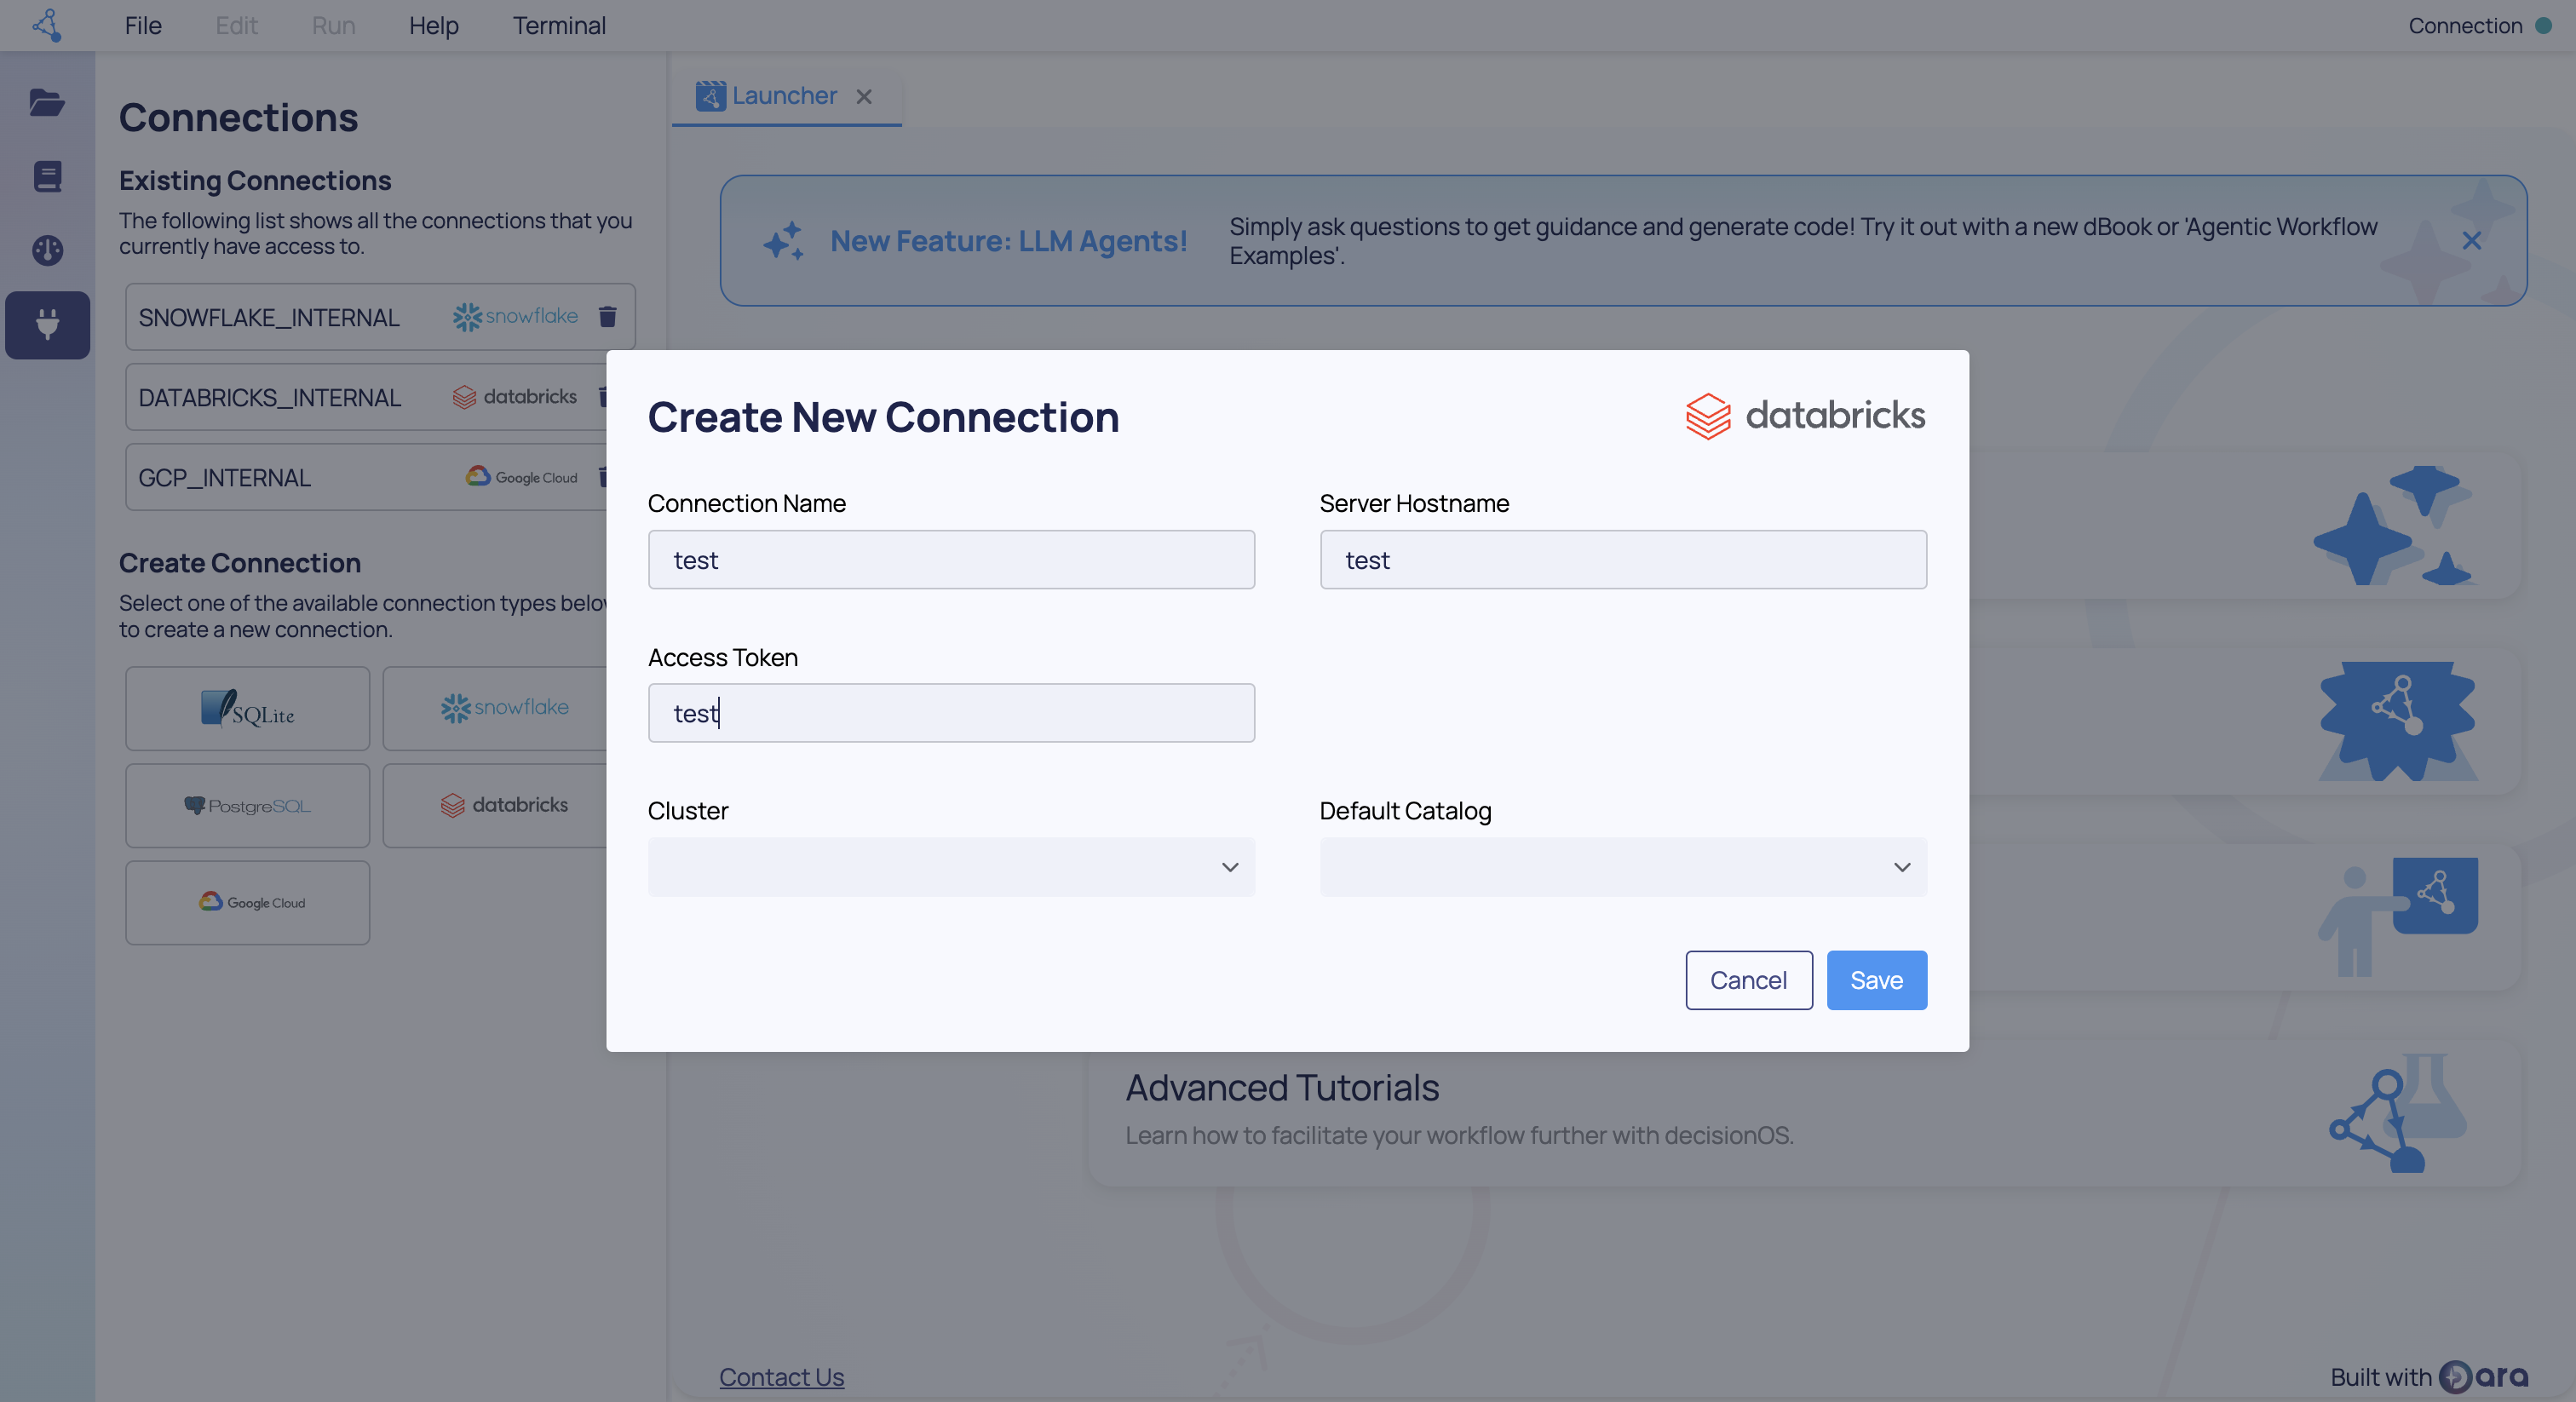
- Connection Name - The name your connection will be stored under for future use.
- Server Hostname - The Server Hostname for your Databricks instance. See below.
- Authentication Method The approach to use for authentication, PAT or M2M
- Access Token - If using PAT - The Access Token for authenticating to Databricks.
- Client ID - If using M2M - The Client Id for the Databricks Service Account.
- Client Secret - If using M2M - The Client Secret for the Databricks Service Account.
- Cluster Name - Optional. The name of your Databricks Spark cluster. Provide this only if you already have an existing Spark cluster you want to query. If you are setting up a connection to create a new Spark cluster, this field can be left blank but it is required for pulling data.
- Default Catalog - Optional. The default catalog for looking up datasets in your Databricks instance. This field can be left blank but it is required for pulling data.
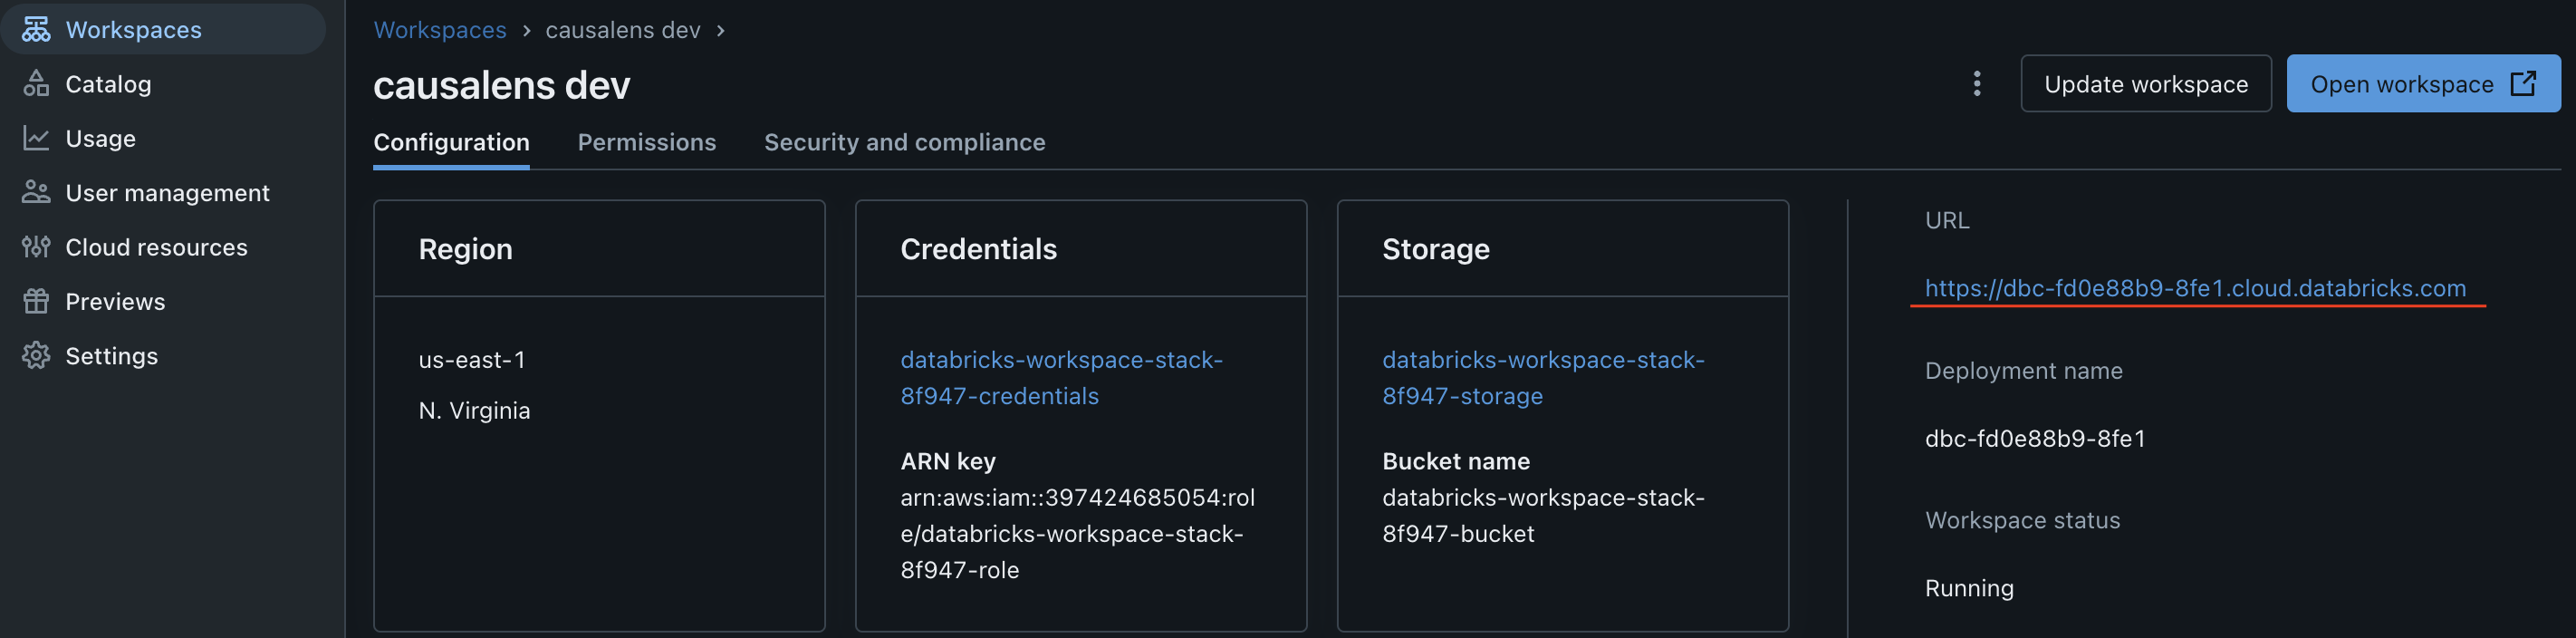
To find the Server Hostname, follow these steps:
- Log in to your Databricks instance
- Click Workspaces
- On the right hand side you should find a URL
When completed then click "Save" and your connection is ready to use.
Alternatively, if you are working outside of decisionStudio then you can create the connection via the python api.
from decision_os_client.connections import DatabricksConnection

db_conn = DatabricksConnection(
    name='your-connection-name',
    connection_kwargs={
        'access_token': 'your-db-access-token',
        'cluster': 'test-cluster',
        'default_catalog': 'your-default-catalog',
        'server_hostname': 'your-db-server-hostname',
    }
)
await db_conn.save()
if you're using M2M authentication, you need to adjust the connection_kwargs as follows:
from decision_os_client.connections import DatabricksConnection

db_conn = DatabricksConnection(
    name='your-connection-name',
    connection_kwargs={
        'client_id': 'your-client-id',
        'client_secret': 'your-client-secret',
        'cluster': 'test-cluster',
        'default_catalog': 'your-default-catalog',
        'server_hostname': 'your-db-server-hostname',
    }
)
await db_conn.save()
cluster and default_catalog parameters are optional. Provide cluster if you already have an existing Spark cluster you want to query. If you are setting up a connection to create a new Spark cluster, this field can be excluded.
If you are working outside of decisionOS, then you will need to pass an instance of decision_os_client.decision_os_client.DecisionOSClient to the connection for storage to work.
3. Create a Databricks Spark cluster
To query data in your Databricks workspace you will need a Databricks Spark cluster. If you already have a running cluster then you can skip this step and move onto step 4.
To create a new cluster, run the following in decisionStudio:
from decision_os_client.connections import DatabricksConnection

# Fetch the connection we just made
db_conn = await DatabricksConnection.get(name='your-connection-name')

# Create the cluster
cluster = db_conn.spark.create_cluster(
    cluster_config={
        'cluster_name': 'test-cluster', # a name for the cluster
        'spark_version': '15.4.x-scala2.12', # The Spark version that the cluster should run on
        'node_type_id': 'm5dn.large', # The node type each Spark worker should run on in the cluster
        'num_workers': 1, # the number of worker nodes to deploy in the cluster
    }
)

# to wait for cluster creation to finish
cluster.result()

# Update your DatabricksConnection to include the cluster name
db_conn.connection_kwargs['cluster'] = cluster.cluster_name
await db_conn.save()
4. Verify the Connection
To ensure the connection is set up correctly, you can run a test query:
from decision_os_client.connections import DatabricksConnection

# Fetch the connection we just made
db_conn = await DatabricksConnection.get(name='your-connection-name')

# Execute a test query to verify the connection
data_ref = db_conn.data.get(query='SELECT * FROM `your_dataset.your_table`')
data_ref.head(10).to_pandas()
Replace 'your_dataset.your_table' with a dataset and table names in your Databricks instance. If the query executes correctly then you are all done and your connection to Databricks is working.
Staring a Spark Session
Databricks is built on top of Apache Spark and Databricks Notebooks allow you to seamlessly connect to the underlying spark instance and pushdown your processing automatically using Spark DataFrames. You can do the same using the integration by creating a remote session from your connection object.
from decision_os_client.connections import DatabricksConnection

# Fetch the connection to use
db_conn = await DatabricksConnection.get(name='your-connection-name')

# Create a spark session using the connection passed, by default this will use the cluster that you picked when creating the connection.
spark = conn.spark.start_session()

# Optionally, you can change the cluster to use for the connection at the point of creating the session by passing in either a name or an id.
spark = conn.spark.start_session(cluster_name='<name_of_cluster>', cluster_id='<id_of_cluster>')

# Then you can use the spark object as you would when running from inside Databricks. Here, we create a Spark DataFrame out of the
# nyctaxi dataset and then pull the first 5 rows back to a local pandas.DataFrame.
df = spark.read.table("samples.nyctaxi.trips")
df.limit(5).toPandas()
Remote Execution in Databricks
As part of the Databricks integration into the causaLens Platform you can push execution of python functions into your Databricks cluster as remote jobs. The implementation builds on top of the @remote decorator which you can find a full explanation of here. You can push a remote function down to Databricks simply by passing your Databricks Connection into the decorator.
from decision_os_client import remote
from decision_os_client.connections import DatabricksConnection

conn = await DatabricksConnection.get('<CONNECTION_NAME>')

# Define the remote task and pass in the connection
@remote(connection=conn)
def run():
    print('Hello from Databricks Job')
    return True

# Run the job
task = run()

# Wait for the result
result = task.await_result()
assert result == True
In its current form the integration does not automatically install dependencies from the Platform environment into the Databricks one. Prior to running a remote function in the cluster you need to install any required dependencies, that are not included by default in Databricks, via the standard mechanisms they expose.
The management API for remote functions is also supported when pushed to databricks by passing the connection into the initial call.
# List all the remote functions
functions = remote.list(connection=conn)

# Delete a function
functions[0].delete() # Note: you don't need to pass connection in again here

# Get a specific function by name - returns a list as name is not forced to be unique
named_functions = remote.get(name='func_name', connection=conn)

# Get the latest result
named_functions[0].list_invocations()[-1].result
Working with Multiple Catalogs
By default the integration will use the default_catalog specified in your connection. You will need permissions to manage volumes, secrets and jobs enabled for this catalog. Sometimes you may want to pull data from one catalog but run the processing under another. To do that then the connection object exposes a use_catalog context manager to temporarily switch catalog.
from decision_os_client import remote
from decision_os_client.connections import DatabricksConnection

conn = await DatabricksConnection.get('<CONNECTION_NAME>')

# Here we assume that your default catalog is set to `samples`
data_ref = conn.data.get(table='nyctaxi.trips')

# Override the catalog to a different one when defining and running the remote function.
with conn.use_catalog('processing_catalog'):
    @remote(connection=conn)
    def run():
        # data_ref is unaffected by the decorator as the catalog has already been resolved at this point.
        return data_ref.limit(100).to_pandas()

    # When this runs it will run under the 'processing_catalog'
    task = run()

# Wait for the result
result = task.await_result()
What Does This Actually Do?
You can skip this section if you don't need to understand how this runs within databricks.
To execute a remote task in the Databricks cluster we perform the following steps:
- Create a new Volume in the Unity Catalog called
remote_executionunder the default_catalog passed to your databricks connection. - Push a
runner_script.pyto the root of the new volume that will be used as the entrypoint for all remote invocations. - Inline the python function to be pushed along with any local variables required to a script file.
- Push the inlined function, the serialized function arguments and two json files with the detail of the remote function and this specific invocation into a new folder under the
remote_executionVolume. - Create a new Job record with a single Task that executes the
runner_script.py - Run the job immediately with the path to the script and serialized arguments passed as run parameters. The cluster used to run this is the cluster selected when creating the connection. If no cluster was selected then the attempt to run the job will fail.
- Return a Task class that can use the Databricks API to fetch the result and check the status of the remote task as it runs.
For subsequent runs of the same function then only a new set of arguments is uploaded as everything else already exists. Rather than creating a new Job then the existing one is reused and run with the new invocation passed in as a run parameter.
At the moment the integration does not allow you to change the cluster used at runtime, but if this is a feature that would benefit you then please reach out to your account executive and we can prioritize this implementation.